Water Expansion Kit Collection Instructions
Introduction
| Upon receiving your Water Expansion Kit please remember to keep it away from children and pets! If you’ve just received your package, carefully open the outermost packaging, making sure not to lose or discard any materials inside the shipping box. Your package will include your “Water Expansion Kit”, along with two sheets of paper. To prepare for collecting your water samples, you will need the following items:
|

These are the materials that you will need to collect your water samples:
- (A) 1 x Water Expansion Kit Collection Box
- (B) 3 x Labeled 0.5-Liter Water Collection Bottles
- 2 x Empty Bottles
- 1 x Pre-filled with Deionized Water (Water without any impurities)
- (C) 3 x Labeled 0.25-Liter Water Collection Bottles
- 2 x Empty Bottles
- 1 x Pre-filled with Deionized Water (Water without any impurities)
- (E) 3 x Resealable Plastic Bag
- (F) 3 x Large Absorbent Pad
- (G) 3 x Biohazard Bag
- (H) 1 x FedEx Clinical Pak with Return Shipping Label
- (I) 1 x Pair of Nitrile Gloves (latex free)
- Pen (not included in the kit) preferably with permanent ink, but any will work
Just like your previous water samples, we would like you to collect water samples that ideally represent the water entering your home, without any additional water treatment measures that you may have, such as filtration or softening. We will provide further instructions on how to bypass any at-home water treatment systems before collecting your samples. We will also provide instructions in the case you are unsure of what treatment systems you have or are unable to bypass some of these systems.
| Precautions When Collecting Samples We are measuring PFAS chemicals that are common in many household items, so it’s important to avoid these types of products when you are collecting a sample of your water. When collecting your water sample, avoid:
|
Please follow the steps below to collect your water samples. We recommend reading all instructions before beginning the collection process. There is also a video summarizing these steps at the bottom of this page. For further assistance in collecting water samples, please contact:
- Elsie Sunderland, ems@seas.harvard.edu, 617-496-0858
- Mona Dai, monadai@g.harvard.edu
After collecting your water samples, please take a brief survey about the samples you collected by clicking here. The survey should take less than five minutes to complete and you will have an opportunity to provide feedback and further detail on your samples.
STEP 1: Select Your Sampling Location
Choose an indoor or outdoor faucet from which to collect your water sample. To ensure that the sample is representative of the water entering your home, do your best to bypass any additional water treatment measures that you may have in place. These may include:
- Water softening units, activated carbon filters, or reverse osmosis systems that are typically installed near the water meter, in the basement, or in a utility room.
- Neutralizing filters that are usually installed after the pressure tank and before any other treatment systems.
- Point-of-use filters, such as Brita faucet filters, that are often found under your sink or on your faucet.
Please note that you do not need to bypass the sediment cartridge filter typically located in the basement and plumbed just after the water pressure tank.
Use the following guidelines to help you choose your sampling location:
- If you do NOT have whole house water treatment, choose a faucet that is used often for drinking or cooking water, such as a kitchen tap.
- If you have a point-of-use filter (under the sink or on the faucet), you will need to either: (1) collect water that doesn’t go through the filter, or (2) select another faucet without treatment.
- If you have whole house water treatment, you will need to either: (1) bypass the water treatment, or (2) collect all water samples from an untreated tap, like an outdoor tap or a spigot in your basement.
- If you collect the water sample from an outdoor faucet so that you can bypass water treatment, do NOT fill the water sample containers using a garden hose or other irrigation device as these plastic devices may contain PFAS.
- If you don’t know what type of water treatment systems your home has or can’t avoid them, please do your best to avoid the ones that you can. We understand that bypassing water treatment systems may be especially difficult if you live in an apartment or condo. You will be able to provide more information about your sampling location in our brief survey in Step 5.
STEP 2: Prepare to Collect Your Samples
Once you have chosen your sampling location, please make sure you have your:
- (B) 2 x Empty larger 0.5-Liter water bottle (labeled)
- (B) 1 x Pre-filled larger 0.5-Liter water bottle (labeled)
- (C) 2 x Empty smaller 0.25-Liter water bottle (labeled)
- (C) 1 x Pre-filled smaller 0.25-Liter water bottle (labeled)
- (E) 3 x resealable plastic bag
- (I) pair of nitrile gloves (latex free)
- Pen (not included in the kit) preferably with permanent ink, but any will work
Please keep the bottles closed until you are ready to collect your samples.
At your chosen sampling location, turn on the cold water and let it run for at least 10 minutes.
- If you are collecting your water sample from a spigot in your basement, you may need to connect your spigot to a hose and let the water drain outside or in a sink. Disconnect the hose before collecting your sample.
Once the water has run for 10 minutes, slow the flow to a thin, pencil-sized stream.
STEP 3: Collect the 2 x Pre-Filled Water Samples
There are 2 pre-filled water bottles in your pack, one larger (B) and one smaller (C). They are filled with deionized water from our lab. Deionized water is just water that has had any and all impurities removed so that it is pure H2O.
- At your chosen sampling location, open one of the pre-filled water bottles, being careful to not set the cap down or let anything touch the inside of the cap or the bottle.
- Let the pre-filled water bottle sit open for at least 15 seconds. Do NOT add any water or any other materials to this water bottle.
- After 15 seconds with the lid off replace the lid and seal it firmly.
- Put the pre-filled bottle into the resealable plastic bag (E).
Repeat this process with both pre-filled water bottles and make sure they are both sealed and placed into their resealable plastic bag (E), and then close the bag.
STEP 4: Collect the 2 x 0.5-Liter Water Samples
Now we will fill the empty water bottles. Start with the 2 larger 0.5-Liter water bottles (B). To collect the 0.5-liter water samples, follow these steps:
- Open the 0.5-liter bottle, being careful to not set the cap down or let anything touch the inside of the cap or the bottle.
- Rinse the bottle by filling it about ¼ of the way full, putting the lid back on, shaking the bottle, taking the lid off, and pouring out the water. Repeat this process two more times.
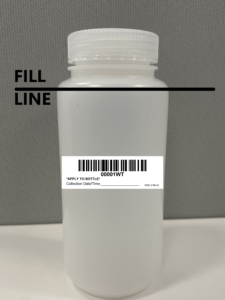
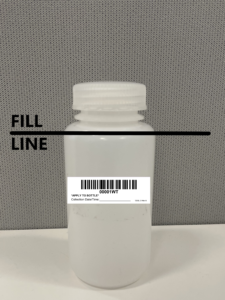
- After rinsing the bottle three times, fill the sample bottle to the top where the bottle begins to slope in (see the image on the right). Replace the lid and seal it firmly.
- Put the filled bottle into the resealable plastic bag (E).
- Repeat this process with your 2nd 0.5-Liter water bottle (B).
STEP 5: Collect the 2 x 0.25-Liter Water Samples
Next fill the 2 smaller 0.25-L water bottles (C). To collect these water samples, follow these steps:
- Open the 0.25-Liter water bottle, being careful to not set the cap down or let anything touch the inside of the cap or the bottle.
- Rinse the bottle by filling it about ¼ of the way full, putting the lid back on, shaking the bottle, taking the lid off, and pouring out the water. Repeat this process 2 more times.
- After rinsing the bottle three times, fill the sample bottle to the top where the bottle begins to slope in (see the image on the right). Replace the lid and seal it firmly.
- Put the filled bottle into the resealable plastic bag (E)
- Repeat this process with your 2nd 0.25-Liter water bottle (C).
STEP 6: After Sample Collection
Turn off the water and remove the gloves.
Using a pen (not included in the kit), please write the time and date that you collected your water samples on the labels of both the larger 0.5-L water bottle (B) and the smaller 0.25-L water bottle (C).
Now, please take the brief survey about your experience and the water samples you collected.
The survey will take no longer than 5-10 minutes to complete and you will have the opportunity to provide feedback. Please click here to access the survey.

STEP 7: Package Samples
- Place your 3 x sealed plastic bags (E) containing the six filled water bottles (B) and (C) inside your Water Expansion Kit box (A).
- Add the large absorbent pads (F) to the box.
- Close the lid of the Water & Toenail collection box (A).
- Place the full box inside the pre-labeled FedEx Envelope (H) and seal the envelope.
STEP 8: Ship Package
Your FedEx envelope is pre-labeled and paid for. Please bring the sealed FedEx envelope to your nearest FedEx drop box or FedEx location. You can find the location of your nearest FedEx by clicking here to visit the FedEx website.
If you are unable to take the package to a FedEx location, you can schedule a FedEx pickup on their website. FedEx will come to your home to collect the package. To schedule a pickup, please click here to complete the FedEx Ground Pick-Up Form on the FedEx website. You can also call FedEx and schedule your FedEx Ground Pickup on the phone by calling 1-800-463-3339. You will need the tracking number from the label that is already attached to your FedEx envelope.
VIDEO SUMMARY OF THE WATER COLLECTION INSTRUCTIONS
AFTER Your Water & Toenail Collection
If you’ve collected your toenail and water samples and sent them back to us, thank you for completing the water & toenail collection portion of Phase II of the St. Louis Baby Tooth – Later Life Health study! Your participation is greatly appreciated.
If you did not take the brief (less than 5-minute) survey about the water samples you collected, please do so now by clicking here.
To ensure that you receive our annual newsletters updating you on the ongoing developments in Phase II, please keep your contact information up-to-date by filling out our update information form. You can access the form by clicking here.
Once again, thank you so much for your invaluable contribution to this study.